Using Auto Layout in Interface Builder can prove trying. While it works reasonably well when you declare constraints on simple views hierarchies, Auto Layout in IB has a couple of major limitations.
- As you saw in our previous Auto Layout tutorial, you cannot declare constraints across views that do not share the same superview in Interface Builder.
- Moving even a solitary view in Interface Builder will often cause the system to create several new constraints that you do not want and that you cannot remove, potentially making much of your previous Auto Layout work moot.
“Constraints: The coolest technology in 10.7 masked by the WORST interface editor ever inflicted on humans.” – Wil Shipley
There must be a better way.
Defining Constraints in Code
You saw code like this in our previous tutorial on Auto Layout:
[NSLayoutConstraint constraintWithItem: acceptButton
                          attribute: NSLayoutAttributeLeft
                          relatedBy: NSLayoutRelationshipEquals
                             toItem: cancelButton
                          attribute: NSLayoutAttributeRight
                         multiplier: 1.0
                           constant: 12];
It’s a little verbose and difficult to tell which item is constrained to which. Is the accept button to the left of the cancel button or to the right? How far apart are they? It’s difficult to tell at a glance with this code.
There must be a better way.
Defining Constraints in Code with the Visual Format Language
There is a better way. With Auto Layout there is a third option that lies between the visual setup in Interface Builder and the powerful code and the ability to define constraints in code. This third option is the Visual Format Language. The Visual Format Language is inspired by ASCII art, allowing you to use text to visually define layout in code. This approach provides a great balance between simplicity of setup and the power of defining constraints in code. To see how it works you will create a new Xcode project to kick the tires.
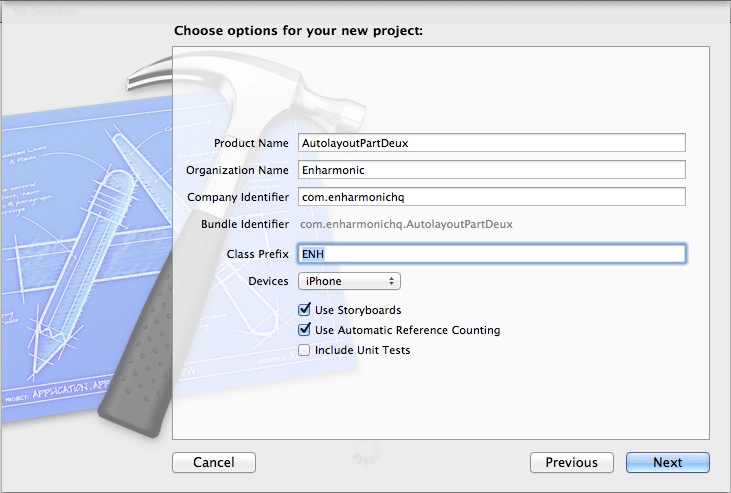
Open Xcode and create a new Single View project, call it AutolayoutPartDeux, use a class prefix of ENH, target the app for iPhone only, use Storyboards and use ARC.
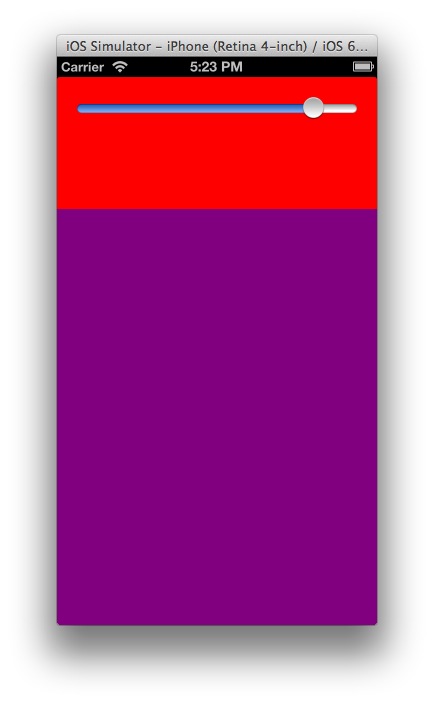
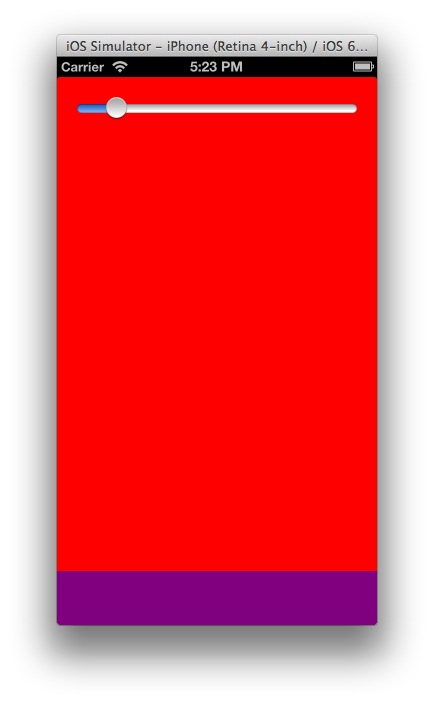
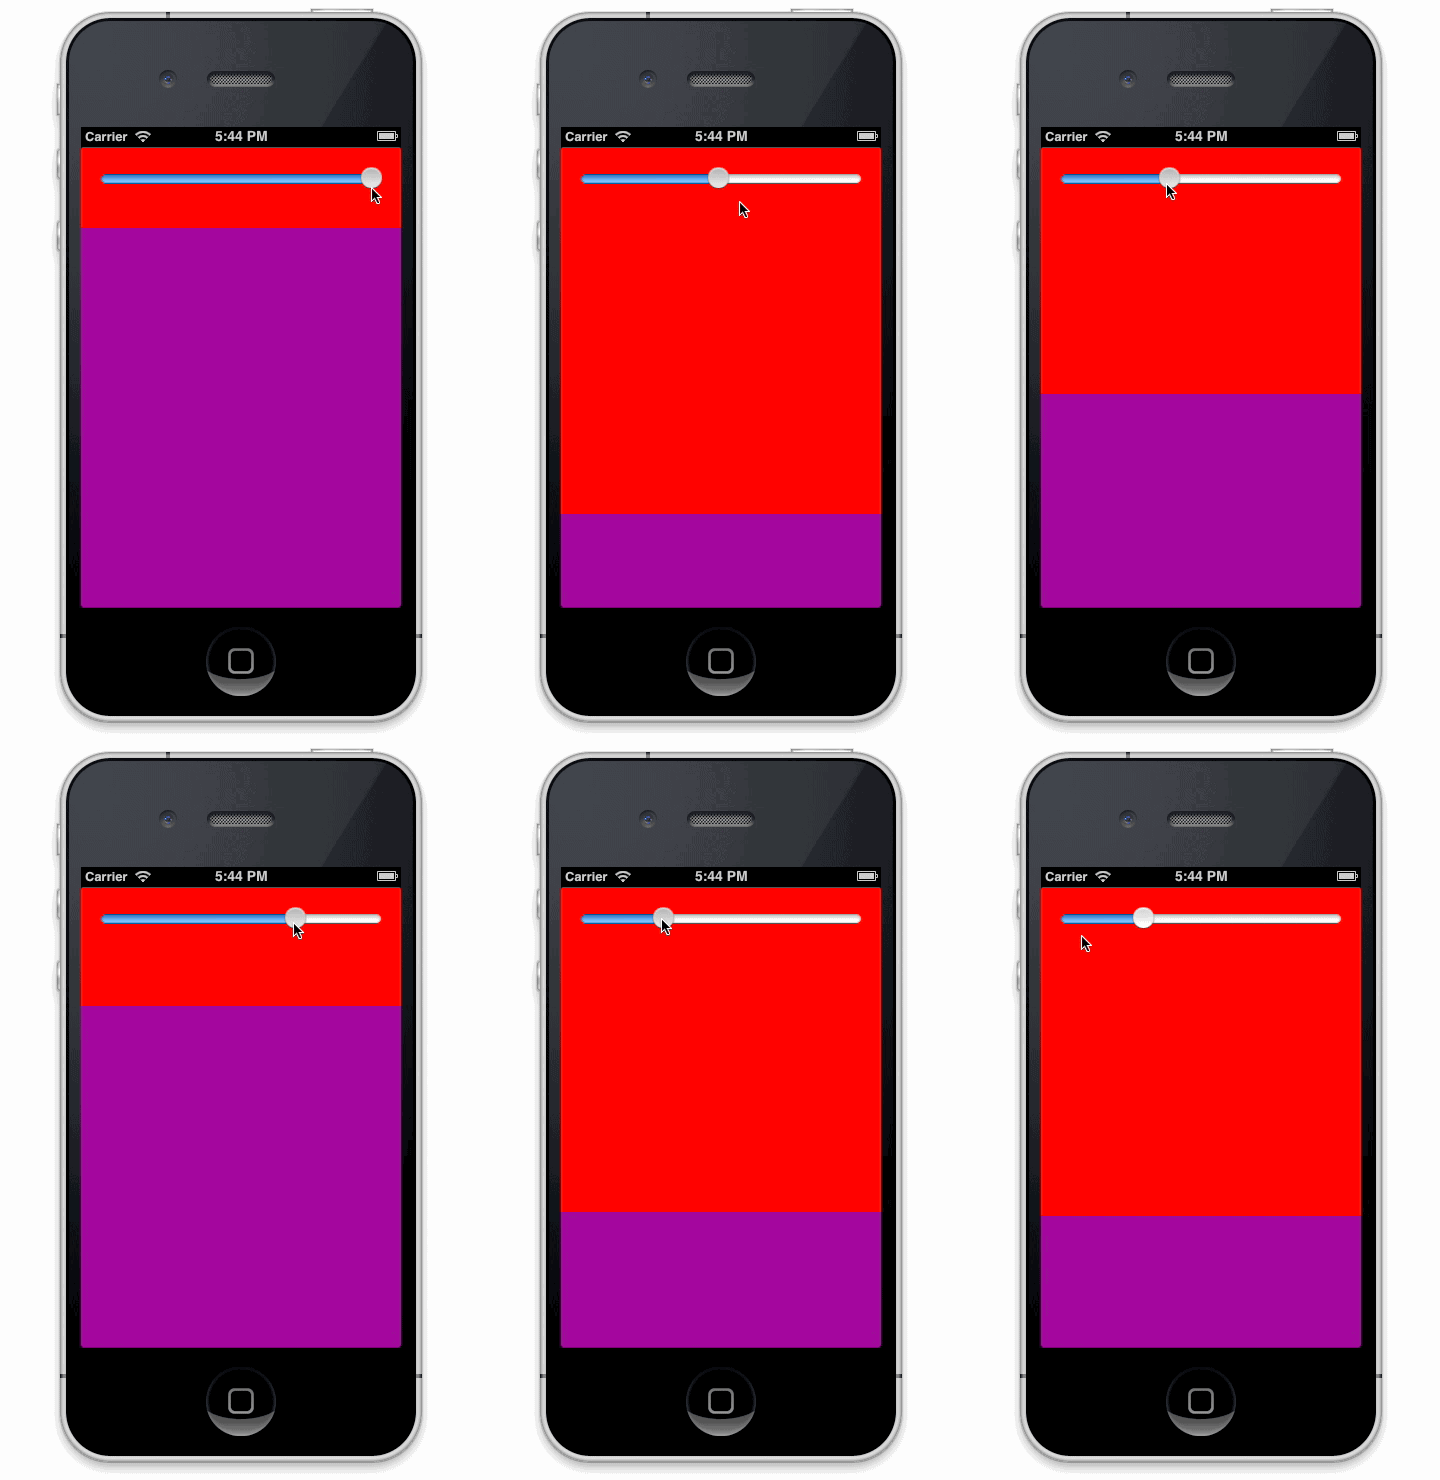
The application you will build will have two views, one above the other. You will use ASCII art strings to set constraints between the two views so that when one resizes, the other also resizes so that together they always fill their superview. The user will be able to control the relative size of the views with a UISlider as shown above.
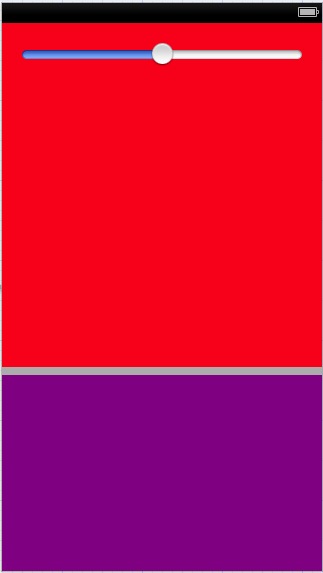
Open MainStoryboard.storyboard and create the basic layout above. Fill roughly two thirds of the top of the view controller’s view with a red UIView and fill the remaining third with a purple UIView. It is okay if there is some space between them. You will take care of their actual layout in code using constraints.
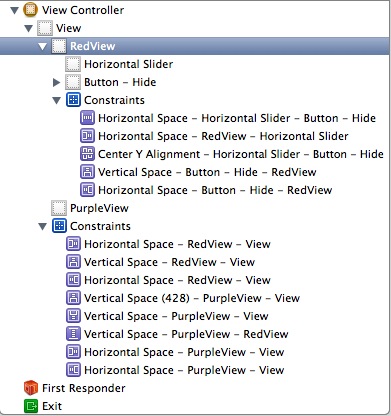
Let IB make whatever constraints it wants to make. You will replace most of them in code later. The constraints might look sort of like the above.

Select the UISlider and set its minimum value to 0 and maximum value to 480 as in the screenshot below. The slider will control the height of the red view.
Now you will create some IBOutlets and a couple of other properties you will need later. Open ENHViewController.m and add the following properties to its class extension. Connect the IBOutlets to their corresponding views.
@interface ENHViewController ()
    @property (weak, nonatomic) IBOutlet UIView *redView;
    @property (weak, nonatomic) IBOutlet UIView *purpleView;
    @property (weak, nonatomic) IBOutlet UISlider *slider;
    @property (strong, nonatomic) NSLayoutConstraint *interestingConstraint;
    @property (nonatomic)float currentConstant;
@end
Now add the following code to viewDidLoad:
        // Remove all constraints controlling the Red and Purple views.
        //They are all of the constraints defined on self.view.
[self.view removeConstraints:self.view.constraints];
NSDictionary *viewsDictionary = NSDictionaryOfVariableBindings (_redView, _purpleView);
NSArray *constraintsStrings = @[@"H:|[_redView]|",
                                @"H:|[_purpleView]|",
                                [NSString stringWithFormat:@"V:|[_redView(>=80@1000)][_purpleView(==%@@%@)]|",
                                 @(floorf([self.slider value])), @(UILayoutPriorityDefaultHigh)],
                                ];

//Create constraints and add them from the strings in the array above.  Grab a reference to the last constraint.
NSArray *lastConstraintArray = nil;
for (NSString *constraintString in constraintsStrings)
{
    lastConstraintArray = [NSLayoutConstraint constraintsWithVisualFormat: constraintString
                                                                  options: 0
                                                                  metrics: nil
                                                                    views: viewsDictionary];
    [self.view addConstraints:lastConstraintArray];
}
In the code above, you are first removing the existing constraints that were setup by interface builder. Next, the visual format string needs an NSDictionary to translate the strings used to represent the views within to actual objects. The dictionary consists of keys, the strings used within the format string, and values, their corresponding views. The NSDictionaryOfVariableBindings () macro helpfully creates a views dictionary using the names of local variables in your code as key strings. In the example above, the dictionary viewsDictionary object would translate to this:
@{@"cancelButton":cancelButton, @"acceptButton":acceptButton}
You can also construct a views dictionary manually if you prefer to use strings other than your variable names in the visual format strings. The NSDictionaryOfVariableBindings macro is just a convenience.
In the next few lines of the above code you create an array of ASCII art strings that you will iterate over to add the constraints to the view. In this code you are creating constraints using the visual formatting language. You are also tracking the last format string’s array. Once you reach the end of the for loop, the value of the lastConstraintArray variable will be set to the array of constraints for the ‘[NSString stringWithFormat:@”V:|[_redView(>=80@1000)][_purpleView(==%@@%@)]|”, @(floorf([self.slider value])), @(UILayoutPriorityDefaultHigh)]’ string.
That constraint string looks a little complicated. Here is how it looks when the slider’s value is zero: ‘@”V:|[_redView(>=80@1000)][_purpleView(==0@750)]|”‘, which translates to “Align the red view to the top of its superview; force the red view’s height to be no less than 80 points tall; align the purple view to the bottom of the red view; make the purple view 0 points tall (the value of the slider, floored) with a priority of 750 (the value of UILayoutPriorityDefaultHigh); align the bottom of the purple view with the bottom of its superview.”
Other members of the UILayoutPriority enum can be found in NSLayoutConstraint.h.
enum {
   UILayoutPriorityRequired = 1000,
   UILayoutPriorityDefaultHigh = 750,
   UILayoutPriorityDefaultLow = 250,
   UILayoutPriorityFittingSizeLevel = 50,
};
typedef float UILayoutPriority;
Visual Format Language
Here is some code similar to the above written using the ASCII art inspired visual format language:
NSDictionary *viewsDictionary = NSDictionaryOfVariableBindings (acceptButton, cancelButton);
NSString *visualFormat = @"H:|-[cancelButton]-12-[acceptButton]-|";
NSArray *someConstraints = [NSLayoutConstraint
        constraintsWithVisualFormat: visualFormat
                            options: 0
                            metrics: nil
                              views: viewsDictionary];
This code is much easier to read. It is clear that the cancel button is to the left of the accept button and that they are 12 points apart. There are some other constraints defined here beyond the constraintWithItem: code. In plain english, the above code translates to “Horizontally place the cancel button the standard HIG distance from the left edge of its superview; place the accept button 12 points to the right of the cancel button; place the accept button the standard HIG distance from the right edge of its superview.” That is three constraints that would require over twenty lines of code with a single string. As our colleague Geoff is would say, “Neat!”
Here are a few more examples translated to English descriptions: "V:|[redView][purpleView]|" translates to “align the top edge of the red view to that of its superview; align the top edge of the purple view to the bottom edge of the red view; align the purple view to the bottom edge of its superview.” The "V:" string signifies that this is a vertical constraint. You can also use "H:" to signify a horizontal constraint, but that is optional. Horizontal constraints are the default.
"H:|-[someButton(=80)]-[someOtherButton]-]" translates to “Align the left edge of someButton the default HIG distance from the left edge of its superview and force it to 80 points wide; align the left edge of someOtherButton the default distance away from someButton; align someOtherButton‘s right edge the default distance away from its superview. The "=80" in parentheses attached to someButton is called a predicate. In this case it forces someButton to always draw with a width of 80 points, therefor Auto Layout will stretch someOtherButton to fill the area to the right of someButton.
Predicates are very useful. If you wanted someButton to be the same width as someOtherButton, you could use this string: "H:|-[someButton(==someOtherButton)]-[someOtherButton]-]". The "==someOtherButton" string constrains someButton to the same width as someOtherButton. If you wanted someButton to be greater than or equal to 70 points wide, you could use a predicate like this one "[someButton(>=70)]".
You can even define multiple predicates at a time. If you wanted someOtherButton to be at least 80 but not greater than 90 points wide, you could use a predicate like this one "[someOtherButton(>=80,<=90>)]".
Predicates can also define the constraint’s priority. Say you want someButton to be at least 80 points wide but it’s more important that someOtherButton draws at least 90 points wide. You could use a format string like this one: "|-[someButton(>=80@250)]-[someOtherButton(>=90@1000)]-]". The "@250" and "@1000" inside of the predicate indicate relative priority of the constraint. A priority of 1000 is the default, so you could have omitted the "@1000" string. In this example someOtherButton will be greater than or equal to 90 points wide, no matter what and someButton will be greater than 80 points wide only as long as it doesn’t cause someOtherButton to draw smaller than 90 points wide. Be aware that sometimes “no matter what” can bite you. If you were to define a set of constraints like this: "|-[someButton(>=80)]-[someOtherButton(>=90)]-]" and the superview of someButton and someOtherButton is 60 points wide, the Auto Layout system will be unable to draw the buttons without breaking one of the constraints. This is known as an “unsatisfiable” set of constraints. Auto Layout will attempt to degrade gracefully in this case, but you should avoid relying on that. Auto Layout will print a warning to the console like this when a set of constraints is unsatisfiable.
2013-04-10 12:00:00.000 someApp[12345:123a] Unable to simultaneously satisfy constraints:
(
    "<NSLayoutConstraint: 0x40082d820 H:[UIButton:0x4004ea720'OK']-(20)-|   (Names: '|':UIView:0x4004ea9a0 ) >",
    "<NSLayoutConstraint: 0x400821b40 H:[UIButton:0x4004ea720'OK']-(29)-|   (Names: '|':UIView:0x4004ea9a0 ) >"
)
Will attempt to recover by breaking constraint
<NSLayoutConstraint: 0x400821b40 H:[UIButton:0x4004ea720'OK']-(29)-|   (Names: '|':UIView:0x4004ea9a0 ) >
Note: the above is an adapted version of Apple’s example from the Auto Layout Programming Guide: Constraint Fundamentals
Now you will find the constraint that corresponds to that controlling the height of the purple view and assign it to the interestingConstraint property for later use. Since the visual formatting language string corresponds to an array of several constraints, you iterate through the constraints that are generated to find the constraint you need. It is the constraint whose first item is the purple view an whose first attribute is NSLayoutAttributeHeight.
Add the following code below the bottom of viewDidLoad.
//Find the constraint controlling the purple view's height
for (NSLayoutConstraint *constraint in lastConstraintArray)
{
    if ([constraint.firstItem isEqual:self.purpleView] &&
        constraint.firstAttribute == NSLayoutAttributeHeight)
    {
        NSLog(@"CONSTRAINT: item1:%@ attr1:%d relation:%d item2:%@ attr2:%d multiplier:%f",
              constraint.firstItem,
              constraint.firstAttribute,
              constraint.relation,
              constraint.secondItem,
              constraint.secondAttribute,
              constraint.multiplier);
        [self setInterestingConstraint:constraint];
        break;
    }
}
Build and run. You should see UI that looks like the screenshot below. Note: the slider will not yet cause any visual behavior.

Now implement the following IBAction and wire-up the slider.
- (IBAction)sliderChanged:(id)sender
{
    NSLog(@"%@ %@ %@", self, NSStringFromSelector(_cmd), @([(UISlider *)sender value]));
    [self.view setNeedsUpdateConstraints];
}
When the slider’s value changes, you call setNeedsUpdateConstraints on the view controller’s view. This will cause the system to call updateViewConstraints on the view controller at some point in the future, much like the behavior of setNeedsLayout calling the layoutSubviews method.
Now implement the updateViewConstraints method.
-(void)updateViewConstraints
{
    NSLog(@"%@ %@", self, NSStringFromSelector(_cmd));
    [super updateViewConstraints];
    NSLayoutConstraint *constraintToMod = [self interestingConstraint];
    [self.interestingConstraint setConstant:floorf([self.slider value])];
}
In updateViewConstraints you set the interestingConstraint‘s constant property to the current floored value of the slider. This will cause the height of the views to change. Ironically, the only attribute of a NSConstraint that you can change after initialization is its constant attribute.
Build and run. The slider should cause the views to resize. The purple view will stick to the bottom of the red view and the red view will never get any shorter than 80 points.
Animating constraints the easy way
Unfortunately, constraints have no animatable properties, but it is still relatively easy to animate the constant property’s value using implicit UIView animation.
First, open the storyboard and uncheck the the slider’s update events checkbox. This will cause the slider to send its IBAction only after the user has “let go” of the slider.
Now open ENHViewController.m and change the sliderChanged: method to look like the below.
- (IBAction)sliderChanged:(id)sender
{
    NSLog(@"%@ %@ %@", self, NSStringFromSelector(_cmd), @([(UISlider *)sender value]));
    [self.view setNeedsUpdateConstraints];

    //make sure the slider is NOT continuous.
    [UIView animateWithDuration:2.0 animations:^{
        [self.view layoutIfNeeded];
    } completion:^(BOOL finished) {
        NSLog(@"DONE");
    }];
}
Build and run. The views should animate when you move the slider and lift your finger.
With the app running, now try moving the slider while the views are animating. You cant. Unfortunately, the constraint animations are blocking the main thread. Animating the constraint with UIView implicit animation is very easy, but it can quickly provide a bad user experience because the interface becomes unresponsive.
Animating constraints the GCD way
You will now implement updating the constraint on an asynchronous background Grand Central Dispatch queue.
First open the storyboard, select the slider, and undo the change you made in the previous section.
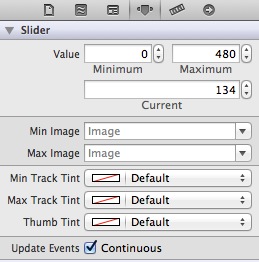
Now open ENHViewController.m and add the following private instance variables to the implementation.
@implementation ENHViewController
{
    dispatch_source_t _timer;
    BOOL _timerRunning;
}
The _timer ivar holds a dispatch_source_t or “dispatch source”. A dispatch source is GCD’s object for responding to events. You will create a dispatch source of type DISPATCH_SOURCE_TYPE_TIMER. It is GCD’s analog to an *NSTimer*. To start and stop a dispatch source timer, you call dispatch_resume and dispatch_suspend, respectively. The _timerRunning ivar will unsurprisingly track whether or not the timer is running.
Every time the timer fires, it runs an event handler block. You set the event handler block by calling the dispatch_source_set_event_handler(dispatch_source_t source, dispatch_block_t handler); function. See /usr/include/dispatch/source.h for more information.
Now implement the startTimer and stopTimer methods below. You will be calling these methods from a background thread, so you wrap the code in each in a @synchronized(self).
-(void)startTimer
{
    NSLog(@"%@", NSStringFromSelector(_cmd));
    @synchronized(self)
    {
        if (!_timerRunning)
        {
            _timerRunning = YES;
            dispatch_resume(_timer);
        }
    }
}

-(void)stopTimer
{
    NSLog(@"%@", NSStringFromSelector(_cmd));
    @synchronized(self)
    {
        if (_timerRunning)
        {
            _timerRunning = NO;
            dispatch_suspend(_timer);
        }
    }
}
Now you will write a method to initialize your timer. Add the following method.
-(void)initTimer
{
    dispatch_queue_t queue = dispatch_get_global_queue(
                             DISPATCH_QUEUE_PRIORITY_DEFAULT, 0);
    //run event handler on the default global async queue
    _timer = dispatch_source_create(DISPATCH_SOURCE_TYPE_TIMER, 0, 0, queue);
    dispatch_time_t now = dispatch_walltime(DISPATCH_TIME_NOW, 0);
    dispatch_source_set_timer(_timer, now, 1.0f/30.0f * NSEC_PER_SEC, 1.0f/300.0f);

    //weak reference to self avoids retain cycles
    __weak typeof(self) blkSelf = self;
    dispatch_source_set_event_handler(_timer, ^{
        NSLayoutConstraint *constraintToMod = [self interestingConstraint];
        float targetConstant = floorf([blkSelf.slider value]);
        float adder = (targetConstant - blkSelf.currentConstant) * .234;
        blkSelf.currentConstant += adder;
        if (fabsf(targetConstant - blkSelf.currentConstant) <= 1.0f)
        {
            blkSelf.currentConstant = targetConstant;
        }
        //        NSLog(@"tick-tock CUR:%f TAR:%f ADD:%f", blkSelf.currentConstant, targetConstant, adder);
        dispatch_async(dispatch_get_main_queue(), ^{
            [constraintToMod setConstant:floorf(blkSelf.currentConstant)];
        });
        if (targetConstant == blkSelf.currentConstant)
        {
            NSLog(@"STOP!");
            [blkSelf stopTimer];
        }
    });
}
The initTimer method first gets the default priority global asynchronous queue.
dispatch_queue_t queue = dispatch_get_global_queue(DISPATCH_QUEUE_PRIORITY_DEFAULT, 0);
Then, it creates the timer and sets it to fire every 1/30th of a second (+- approximate 1/300th of a second).
_timer = dispatch_source_create(DISPATCH_SOURCE_TYPE_TIMER, 0, 0, queue);
dispatch_time_t now = dispatch_walltime(DISPATCH_TIME_NOW, 0);
dispatch_source_set_timer(_timer, now, 1.0f/30.0f * NSEC_PER_SEC, 1.0f/300.0f);
Then, the event handler is created with dispatch_source_set_event_handler call.
 dispatch_source_set_event_handler(_timer, ^{
   NSLayoutConstraint *constraintToMod = [self interestingConstraint];
The targetConstant is the constant value you would like to animate to over time.
float targetConstant = floorf([blkSelf.slider value]);
Every approximately 1/30th of a second add the difference between the current constant and the target constant times .234. This will cause the animation to be fast at first, then slower as it nears the target.
 float adder = (targetConstant - blkSelf.currentConstant) * .234;
 blkSelf.currentConstant += adder;
If the target is not yet within one point of the current constant, set the constraint’s constant to the current constant. You are using dispatch_async on the main queue to ensure that this value is set on the main thread.
 if (fabsf(targetConstant - blkSelf.currentConstant) <= 1.0f)
 {
                blkSelf.currentConstant = targetConstant;
            }
            dispatch_async(dispatch_get_main_queue(), ^{
                [constraintToMod setConstant:floorf(blkSelf.currentConstant)];
            });
Otherwise, stop the animation by stopping the timer.
            if (targetConstant == blkSelf.currentConstant)
            {
                NSLog(@"STOP!");
                [blkSelf stopTimer];
            }
        });
    }
All that is left is to initialize the timer in viewDidLoad by calling initTimer.
- (void)viewDidLoad
{
    [super viewDidLoad];

    if (!_timer)
    {
        [self initTimer];
    }

    // Do any additional setup after loading the view, typically from a nib.
    [self.view removeConstraints:self.view.constraints];
    ...
}
Build and run. Moving the slider around will animate the heights of the views. Since you are no longer blocking the main thread during the animations, moving the slider will update the target constant while the animation is being performed.
Solution Project available on GitHub